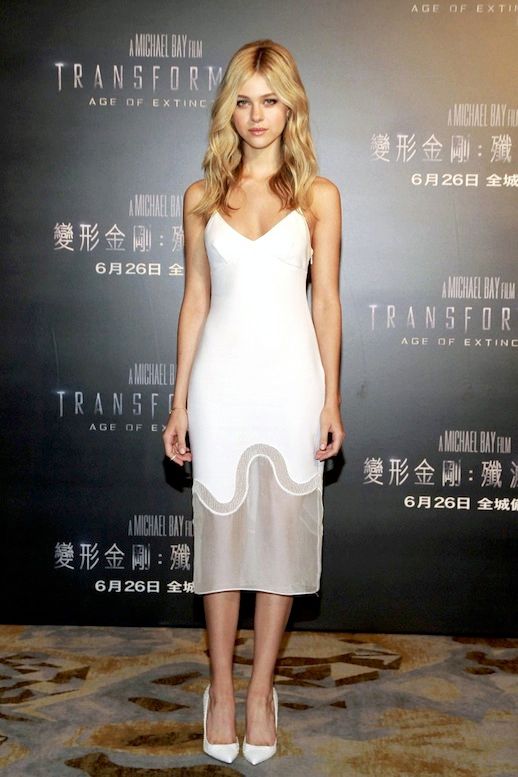
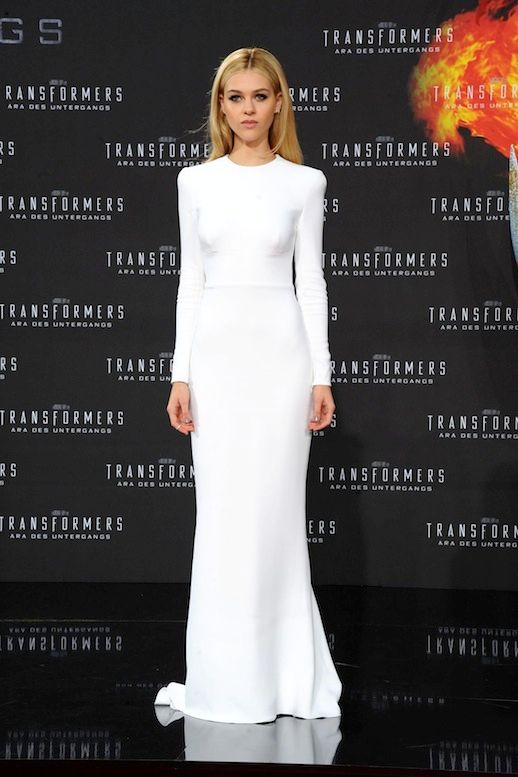
Photos via: W Mag | Perez Hilton | Harper’s Bazaar UK
Nicola Peltz just jumped on my radar with the stunning white Stella McCartney dresses she wore during the Transformers press tour. Can’t decide which look I like the most…
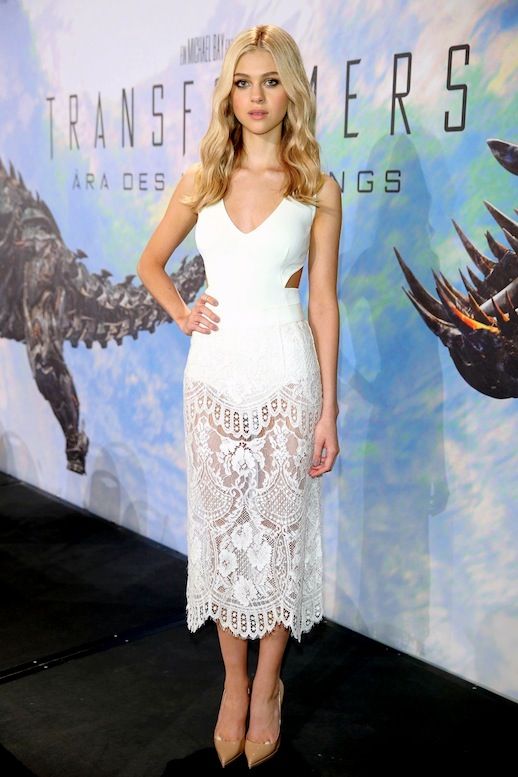
Photos via: W Mag | Perez Hilton | Harper’s Bazaar UK
Nicola Peltz just jumped on my radar with the stunning white Stella McCartney dresses she wore during the Transformers press tour. Can’t decide which look I like the most…


 ¡Buenas noches a todos! Al fin tengo un rato para publicar este post, ¡estaba impaciente! Es una colaboración con la maravillosa fotógrafa Miriam, de Miriam M.R Photography (podéis ver su post aquí). Como podréis recordar, ya trabajamos juntas, además de con las peluqueras y maquilladoras Sencilla y Sofisticada, el año pasado para un reportaje romántico otoñal (aquí tenéis el link del reportaje). Al igual que la vez anterior, ha sido un placer trabajar con Miriam, y como podéis ver, el entorno era de una belleza inigualable: un prado verde con Sierra Nevada de fondo, en un atardecer con un vibrante cielo azul. ¡Gracias!
Good night everyone! I finally have a little while to upload a post, I was impatient! It is a collaboration with the marvelous photographer Miriam, from Miriam M.R Photography (you can see her post here). As you may remember, we worked together, as well as with Sencilla y Sofisticada, last year (this is the link to that post). It has been a pleasure working with Miriam again, and as you can see, the setting couldn’t be more beautiful: a green meadow with Sierra Nevada in the back in a sunset with a vibrating blue sky. Thanks!
Vestido/ dress – vintage
Tiara floral/ floral headband – Claire’s
Echarpe/ scarf – vintage
Botas/ boots – (from a local shop in Morocco)

The first (and most difficult) step to your leaner, curated wardrobe is to edit it. I actually enjoy this step immensely. There is nothing quite so satisfying when at the end you’re left with a collection of clothing, hanging in your closet, folded on your shelves, that is one-thousand percent you. To help you start one of the most difficult steps, below is a more detailed guide to a successful wardrobe edit:
Follow the same guidelines for your shoes, accessories and undergarments. Only keep what you wear and what is in good condition. Undergarments should be comfortable, intact and (of course) pretty.
Most the time you’ll find that if you haven’t worn an item in the last six months (taking into account the weather) you probably don’t actually like it that much, and wont wear it again. The goal of a perfect wardrobe is to own pieces of clothing the you pull out again and again, that you love, and that you feel yourself in. If you try on something, look in the mirror and don’t feel attractive in it (wrong fit, color, material) then don’t keep it! Even the pieces you still love but are no longer flattering/ no longer your style. I can’t tell you the amount of times I forced myself to face the facts and part with a piece because it wasn’t me anymore. It’s incredibly hard to do, but I have never regretted it. I allow myself a few sentimental pieces (like my mothers caramel suede pencil skirt from the 70’s, and the t-shirt I was wearing when I met my husband). Keep a critical eye and your goal in mind and the results will be well worth it. I often suggest to maybe repeat the cull a week or two later- that way you’ll be sure to clean everything out and not make sentimental choices to keep pieces.
Once you’re done, you’ll be left with a smaller pile of clothing that are in good shape, fit well and make you feel great. Then pat yourself on the back because you have successfully completed on of the harder steps and are well on your way to your perfectly curated wardrobe.
Source: Wide eyed legless


TO CREATE: Gather all hair and bring to one side. Loosely fishtail braid and secure with small elastic. Pull a few pieces to give dimension. Add a flower crown to give that extra touch.
Mini Braids

TO CREATE: Brush through hair and part down the center. On one side, take a small section an inch behind ear and create a small braid. Secure with small elastic. Repeat on other side.
Fishtail pigtails


TO CREATE: Part hair down the center and create loose fishtail braid pigtails, securing with small elastics. Take first braid, lay horizontal along nape bringing to opposite side and pin down with bobbi pin an inch behind ear. Repeat on other side and criss cross. Use as many bobbi pins as needed to help further secure your up-do. Tuck end pieces underneath braids near ear.
Source: Little Lady


¡Hola! Hacía mucho que no subía un outfit y que no escribía algo… y esque ando muuy liada últimamente. Aquí os traigo unas fotos con un look muy primaveral en tonos azules, que tanto se llevan (sobre todo el celeste). Espero que os guste y que paséis una magnífica semana 😉
Hi! It’s been a long time since I last posted an outfit and wrote done a few words… I’ve been soooo busy lately. Here I bring you a spring look in blue tones, which are so in this season (mostly sky blue). I hope you like it and that you have a wonderful week 😉

Corta pequeños rectángulos de la portada de plástico de un cuaderno o de una carpetilla de plástico. Cóselas de abajo a arriba en la zona de los hombros de un jersey/camiseta en un tono neutro para que resalten más.
El resultado debe tener un aspecto irregular, así que no intentes coserlas en hileras.
Cut small scales (about 60 pc) from a colorful exercise book cover, and sew them one after the other, from the bottom to the top, on shoulders -or anything you want- of a tee or a fine sweater.
The result must look irregular, so don’t try it on straight lines like an elastic belt for example.


Have a wonderful weekend!
Source: http://www.virginiepeny.com/

This eye is inspired by all of the gorgeous creatures from the feline family! Ok, hear me out. Tigers, leopards and cheetahs all have black rims around their eyes that really frame them. But it’s more than that. We can all rim our eyes with a black pencil (still one of my favorite looks!). And we can all draw a cat eye. But this combines the two and adds a little V in the inside corner. Why? Oh just to make it more stylized and like an exotic little cat! It’s 100% wearable, I promise. And quite sexy. I exaggerated the inside corner a little on our model above but you can shorten it and still get the same effect. Here’s how:
TOOLS:
STEPS:
Finish with mascara and pair it with any lip color you want!
Source: thebeautydepartment.com
Expert Tips for Vintage and Antique Lover
A blog about fashion, photography and DIYs
A blog about fashion, photography and DIYs
A blog about fashion, photography and DIYs
A blog about fashion, photography and DIYs
Four girls : One Blog !!
A blog about fashion, photography and DIYs
A blog about fashion, photography and DIYs
A blog about fashion, photography and DIYs
A blog about fashion, photography and DIYs
Le Blog de Betty : Blog mode, blog tendances, photos de mode par Betty Autier
A blog about fashion, photography and DIYs