DIY: The Jelly Sweater
Corta pequeños rectángulos de la portada de plástico de un cuaderno o de una carpetilla de plástico. Cóselas de abajo a arriba en la zona de los hombros de un jersey/camiseta en un tono neutro para que resalten más.
El resultado debe tener un aspecto irregular, así que no intentes coserlas en hileras.
Cut small scales (about 60 pc) from a colorful exercise book cover, and sew them one after the other, from the bottom to the top, on shoulders -or anything you want- of a tee or a fine sweater.
The result must look irregular, so don’t try it on straight lines like an elastic belt for example.
Have a wonderful weekend!
Source: http://www.virginiepeny.com/
DIY: Chanel inspired laces
Shoes: ZARA
Everyone is going bananas ever since the Chanel Couture show last week…Sneakers on Couture gowns? Karls’ shock value.
I tried finding something as similar as the ones used on the Chanel Couture sneakers but I was running out of time -and running out of town-, so organza lace had to do. You can of course use any type of lace you prefer.
I LOVE the end result, I really do and this my friends is quite possibly one of the quickest DIY’s known to date. Chanelize your shoes ladies! ![]()
Source: stylescrapbook
DIY SEQUIN MAXI WRAP SKIRT


And there you go! Such a simple piece for party celebrations, I love pairing mine with a silk midriff top or slouchy singlet and simple black flats.

PIOL: Designing for the future

Acabo de descubrir esta tienda online que me ha parecido absolutamente revolucionaria: PIOL. Se aproxima mucho a diseñar y coser, solo que no necesitas tecnica alguna, ¡solo hacer click! Increíble, ¿no? Echadle un vistazo, es alucinante. Primero seleccionas tu tono de pelo, ojos y piel; luego el modelo de vestido (puedes modificar cada parte), el tejido y estampado, tus medidas… Aquí os dejo todas las instrucciones.
With a three-fold approach to fashion – color, style and fit – PIOL allows you to create your very own uniquely designed dress from scratch that in the end, teaches us there’s much more that goes into looking our best then we once thought. This amazing platform provides insightful and uplifting information providing direction and encouragement to follow our own intuition and basic instincts when it comes to getting dressed. By combining state of the art technology with the skill and knowledge of one of the fashion industry’s greats, PIOL has taken the simple notion of buying a dress and launched it into the 21st century.
Edith Head, a once prominent fixture in the fashion and design world, spent most of her life dressing Hollywood’s elite during its’ golden age. She worked in the industry for over half a century, dressing clients’ such as; Bette Davis, Shirley MacLaine, Grace Kelly, Audrey Hepburn, Elizabeth Taylor and Sophia Loren which helped her to develop a key eye and sense for what made each of them look their best. In the end she came away with an ever-lasting career that provided her with 35 Oscar nominations and eight academy awards (more than any other woman has ever won) as well as the wealth of knowledge that PIOL has based its’ platform off of. She realized even the world’s most beautiful have flaws just like the rest of us, except she knew how to cover them up – “It’s all about learning how to accentuate the positive and camouflage the negative” – and that in turn is how the Edith Head philosophy was born.

The first step that PIOL uses to assess what works (or doesn’t work) for you is all about color. Each of us has a unique combination of hair, eye and skin color which can either be hindered or highlighted depending on what colors we choose to wear on our bodies. This “color aura”, as Edith calls it, is a list that consists of four colors based off of your answers that help to provide a specific palette of colors and patterns that fit each of our individual color combination.

The next step is all about style. First, pick one of the five silhouettes that PIOL provides (don’t worry, it’s just a base, you’ll be able to customize it later). As you virtually enter your personal design room you can see your “color aura” at the top right of the screen with a plethora of high quality Italian and Japanese fabrics to the left of your silhouette for you to choose from. These cottons, silks and jerseys have been specifically chosen so that they match your answers to the color questions you previously answered guaranteeing a palette that will exemplify your baby blues, firey-red hair or deep olive complexion. As you decide on what type of fabric to use, you’re also provided with a variety of necklines, skirts, sleeves (and in some cases an “additional touch”) to choose from per each silhouette, thus allowing you to customize every inch of your garment so you can showoff your best and hide your not as flattering features.

Last, and most importantly, it’s time to discuss fit. This “final ingredient” – as they call it – is to ensure that your garment fits you precisely from head-to-toe. Not sure how to properly measure? Don’t have a measuring tape? Not a problem. PIOL not only teaches you along the way in simple directions how to properly measure your bust, waist and hips but will send you a measuring tape free of charge so your go-to dress will fit you perfectly every time. To quote Edith Head “Excellent fit is one of the first requirements of dressing for success.”

So whether you’re having fun and designing the dress of your dreams for a special occasion or a one-of-a-kind timeless LBD staple, once designed, in 3-4 weeks this priceless investment piece will be at your front door waiting for you to love it forever. And trust us, once you have a dress that is made to measure you may never look at off the rack the same ever again.
See how Olivia styles her perfect PIOL go-to dress below!

DIY Balenciaga inspired ruffle skirt
Me hice esta falda inspirada en la colección de Balenciaga primavera/verano ’13 siguiendo el tutorial de la creativa Geneva de A pair and a spare (haz click para ver su tutorial al completo). Os recomiendo de corazón que le echéis un vistazo a su blog de DIYs, ¡me encanta!
Espero que disfrutéis este tutorial y os pongáis mucho vuestra falda; la clásica combinación blanco&negro vuelve a estar muy de moda esta estación 🙂
I did myself this great skirt inspired in Balenciaga’s SS13 collection following the creative Geneva from A pair and a spare (click to see her full tutorial). I truly recommend you to have a look at her DIY blog, I love it!
I hope you enjoy this DIY, the classic balck & white combo is very in this season 🙂
You need:
- A simple black skirt
- 1m (approx 1 yard) of white cotton fabric
- 1m (approx 1 yard) of black cotton fabric
- Dressmaker’s Scissors
- Black and white thread
- A Sewing machine
- Measuring tape
- Pins
or get a sewing kit here.

How to:
1. Cut your skirt into an asymmetric style (shorter on one side than the other). You can go quite short of the shorter edge (almost to your underwear line) because you are going to be adding the ruffled piece which will cover you.

2. Take your measuring tape and measure the edge of the asymmetric hem of the skirt all the way around.

3. Using the method I showed you here in the fluted hem skirt tutorial, create two circular hem pieces in both black and white.

4. Pin the two black and white ruffled hem pieces together.

5. Sew the two together on the outside edge.

6. Turn inside out and the iron flat.

7. Pin the inner edge of the donut to the skirt with the white on the outside and the black on the inside (or vise versus if you perfer).

8. Sew along the hem and then sew along the edge with the zig zag stitch to reduce fraying.

 Puedes ver el look al completo aquí/ You can see the full outfit here
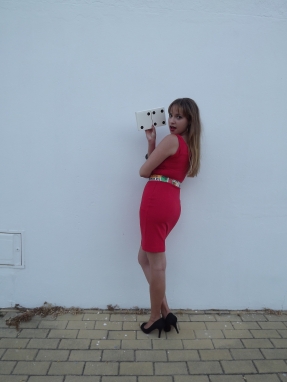
DIY a domino clutch
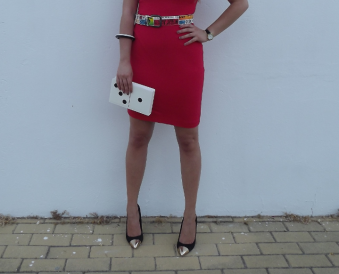
¡He aquí mi primer DIY! Mi inspiración para este bolso rígido fue un clutch Charlotte Olympia, una diseñadora muuuuuy original. Llevé este bolsito hecho por mí misma en mi cumple, y podéis ver el look completo aquí.
Here is my first DIY! I was inspired by Charlotte Olympia’s domino clutch, she is a really original designer. I wore it in my birthday, and you can see the complete look here.
LO QUE VAS A NECESITAR/ WHAT YOU’LL NEED:
La caja de una cinta de vídeo/ the box of a video tape
Tijeras/ Scisors
Fieltro blanco/ white felt
pegatinas redondas negras/ black rounded stikers
pegamento (usé una pistola de pegamento) / glue (I used a glue gun)
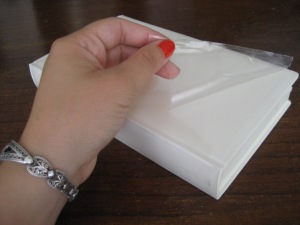
1. Quítale el plástico transparente / Take off the transparent plastic
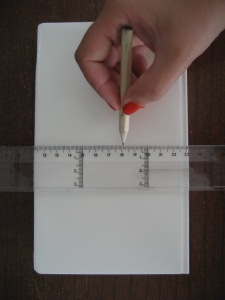
2. Traza un línea vertical a la mitad de la caja/ draw a vertical line at the half of the box
3. Traza dos diagonales en cada lado/ draw two diagonals at each side
4. Pega las pegatinas dibujando el número que desees a cada lado/ stick the stickers drawing the numbers you prefer at each side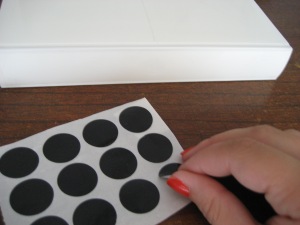
5. Abre la caja y utilízala como guía para dibujar un triángulo en el fieltro. Recorta otro igual / Open the box and use it as a guide to draw a triangle. Make another equal one
6. Pégalo en el interior / stick inside
¡Y… listo!/ And…done!




Leave a comment